14 Oct 8 Tips and Tricks to Learning Modern Calligraphy
“Who uses calligraphy anyway?” the man thought to himself.
The woman was discussing the popularity of her skill at calligraphy. She was explaining how she was especially in demand when it came to writing wedding invitations. The man decided to have a closer look. As he peered over her shoulder, he immediately realized what an impression such a customization had on something as simple as an invitation.
“But I could never do that,” he said under his breath.
Is calligraphy really out of reach for most people? Possibly in times gone by, but today there are many tips and tricks that can help even the most novice of persons create their very own written piece of art.
These 8 tips will put you on the right path to becoming an accomplished calligrapher.
1. Get a calligraphy starter kit
When you hear that you’re going to have to buy something, your first thought is likely, “How much is it?” That’s the great thing about calligraphy — the kits and materials can be low in cost or they might already be at hand. Use this list to make sure you have everything you need to get started:
- Nibs (two or more)
- Pen holder
- Multipurpose laserjet/copier paper (24# or 30# weight; the smoother the better)
- Ink (sumi or India)
- Water
- Cloth with a high thread count (dinner napkins work well, too)
A quick search on Amazon.com reveals that calligraphy kits can range in price for less than $10 to more than $100. As a beginner, you will likely want to start out with the lower-cost options and potentially work your way up as you become more proficient.
2. Learn the components of the pen
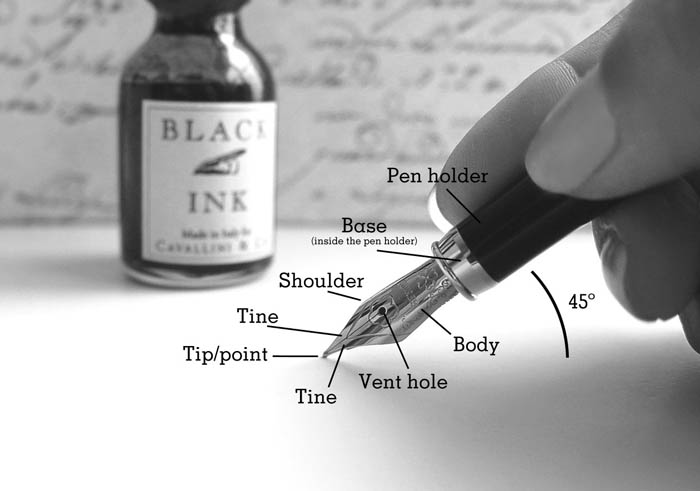
Each calligraphy pen has two main parts: the pen holder and the nib. The pen holder is the long pen-like piece that holds the nib.
The nib is the part that actually holds the ink. Usually metal, it slides into a concave area at the end of the pen holder. The nib is actually a rather intricate part of a calligraphy pen. It comprises a tip or point, two tines, a slit that leads to a vent or breather hole, a shoulder, a body or shank, and the base, tail, or heel. (Note the anatomy of the nib as illustrated in the photo above.)
Be sure to clean your nib before use. Manufacturer oils are commonly present and could interfere with your ink. Also, assemble your calligraphy pen as indicated in the kit instructions.
3. Hold the pen correctly
Don’t expect to just hold a calligraphy pen as you would any other writing utensil. The hold is important to the form of the letters, so think about your grip as you learn to do calligraphy.
Your thumb and forefinger should pinch the pen holder while your middle finger goes behind the pen holder for support. A forty-five degree angle is key for drawing the best line. And the nib should always lead the line you are drawing.
4. Dip your nib right
Sometimes, we get a little excited and try to dip things until we’re in past our shoulders – like at last year’s Super Bowl party chip dip. So, be careful how much you put your nib in the ink. Dip it just past the shoulder of the nib — no deeper.
5. Begin each session with practice line drawing
Any fitness guru will tell you how important the warmup is to every exercise routine. Similarly, even the expert calligrapher knows that, each time they sit down to write in calligraphy, they need to begin with practice strokes.
Get a scratch sheet of paper to draw on. Watch how you’re holding the pen. Make sure the nib leads your line. Keep the pen at a 45º angle. Get used to dipping your pen in ink. Note how the ink is flowing off the tip of your nib.
6. Use practice worksheets
A variety of practice worksheets are available. They come in an abundance of styles, too. Just do an Internet search for “calligraphy worksheets” and find the one that works best for you.
Practice worksheets typically have a space below the printed letters that allow you to re-write the letter. The nice thing about these printable worksheets is that you can print as many as you would like. No worries about erasing or getting upset about a mistake. It’s all practice.
One resource to get started: www.juliabausenhardt.com. If you sign up for the newsletter, you’re provided four practice sheets for free. These sheets represent four different styles of calligraphy. So, you can master one or you can master them all. It’s your choice.
7. Focus on each letter’s parts and not the sum
When you handwrite something, you probably give little thought to how you’re forming the letters — the strokes that make up the letters. With calligraphy, you will have to flip that mentality.
Focus on the individual parts of each letter. Each letter is built by making multiple strokes. And you’re going to have to practice those strokes. You may end up with a sheet full of unfinished letters, but it will help you in the long run. Trust us.
8. Use calligraphy liberally
There are so many applications for your developing skill of calligraphy, sometimes it just takes a list (like the one below) to push you in the right direction. You might even jump over to Pinterest.com and do a search for “calligraphy.” Then you’ll see the ideas come flooding in.
- Envelopes
- Signs
- Announcements
- Invitations
- Name badges
- Greeting cards
- Postcards
- Recipe cards
- Placecards
- Book covers
- Carvings
- Chalkboards
- Kitchen menus
- Bulletins
- Dyeing fabrics
- Favor wraps
- Poetry
- Icing cakes
- Stationery
- Resolutions
- Personal signature


No Comments